Error Code 12002 has been bothering many QuickBooks users lately. This error is usually caused by a slow internet or a network timeout. In this article, we'll figure out the various avenues to fix QuickBooks Error 12002 on your computer. If you need expert help, feel free to get in touch with our Technical Team at +1800-615-2347.
What provokes QuickBooks Error 12002?
The firewall or antivirus might limit your QuickBooks functionalities.
QuickBooks Error 12002 can also be caused by incorrect SSL settings.
Your system speed might be too slow.
Internet Explorer is not set as your default browser.
Misconfigurations in the Internet settings may also lead to Error code 12002 in QuickBooks.
What are the steps to fix QuickBooks Error 12002?
Step 1: Internet Explorer should be set as your Default Browser
To get to the Run box, press the Windows key and the R key on your keyboard at the same time.
Type INETCPL.CPL into the Run window and tap on Ok.
Now, head to Programs.
The next step is to make Internet Explorer as the default browser.
After that, relaunch QuickBooks program to see if the solution helped in troubleshooting Error code 12002.
Step 2: Configure Internet settings
Use the Windows + R keys to open the Run window.
Then, in the Run box, type INETCPL.CPL and hit the Enter key.
Here, you should check if the security level is set to Medium-high.
You can make sure of this by choosing the Internet icon, followed by hitting on the Security tab.
Now, go to the Connections tab and click on the LAN settings option.
Check the box next to Automatically detect settings in the Connections box. Also, the box next to use a proxy server from your LAN should not be checked, and if it is, you need to type in the correct I.P. and Port.
After that, click OK.
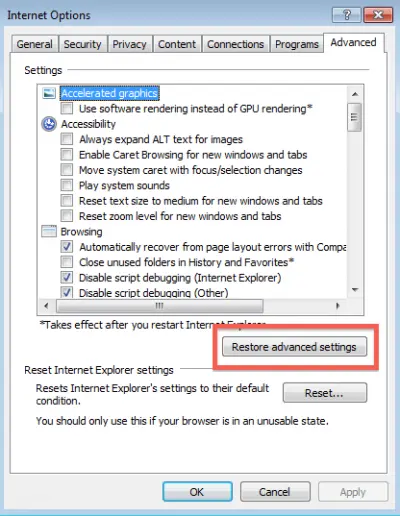
Next, move to the security section on the Advanced page.
Make sure that the option to Use TLS 1.2 is selected in the Security section. If not, pick the same one and click OK.
Now, restart your computer to see if error 12002 has been fixed.
Step 3: Update QuickBooks
First, close QuickBooks.
Now, double-click the QuickBooks icon on your desktop and keep holding down the Ctrl key on your keyboard till the No Company Open window shows up.
The QuickBooks program will begin to run. Leave the Ctrl key soon after.
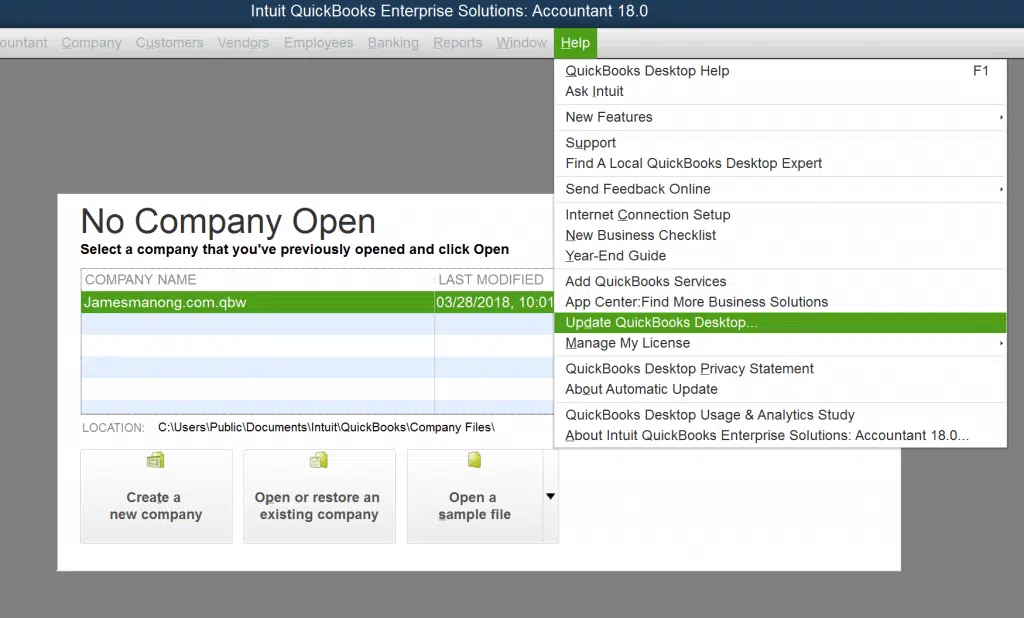
Once the QuickBooks window is open, go to the Help menu and then click on the option to Update QuickBooks Desktop.
Now, click the Update Now button.
After that, click Get Updates, then Reset Updates.
Press the OK button to finish.
When the update is done, click Close.
Now, you need to start up QuickBooks Desktop again to install the updates you just downloaded.
When you open the accounting software, provide your consent to install the updates by hitting on Yes.
Step 4: Incorporate QuickBooks as exception in the Firewall
Click on the Start button initially.
Move on to the Windows Firewall and double-click on its icon to open it.
Go to the Advanced Settings section of the firewall and right-click the Inbound Rules section.
Tap New Rule, then choose the right Port.
Choose TCP, then click Next.
In this case, you must choose the Port for your QuickBooks version.
For QuickBooks 2019, the port numbers are 8019, 56728, 55378-55382, and 56276, 55368-55372.
After picking the Port and typing it in, you need to tap Allow Connection and then Next.
In the pop-up window, make sure that each profile is chosen.
After giving the new rule a name, click on Next.
After that, click on Finish.
Proceed as above in case of outbound rules as well.
If the solution doesn't fix QuickBooks Error 12002, you should move on to the next one.
Step 5: Proceed for clean installing QuickBooks Desktop
For this solution to work towards resolving QuickBooks error 12002, you need to reinstall the QuickBooks software from scratch.
You can manually uninstall QuickBooks through the Control Panel, or you can use the QuickBooks Clean Install Tool to make sure that the software is completely removed. If you choose the manual method, make sure to delete or rename the QuickBooks folder after removing the program from the Control Panel.
Once that is done, you can install QuickBooks again.
This blog enumerated the different steps to fix QuickBooks Error 12002. For further assistance, you may call our QuickBooks experts at the helpline at +1800-615-2347.
Like it? Share it!
About the Author
Alex Nelson Joined: August 4th, 2022 Articles Posted: 8