The Ultimate Guide To Netgear N300 WiFi Range Extender SetupPosted by Aaron Paker on March 12th, 2019
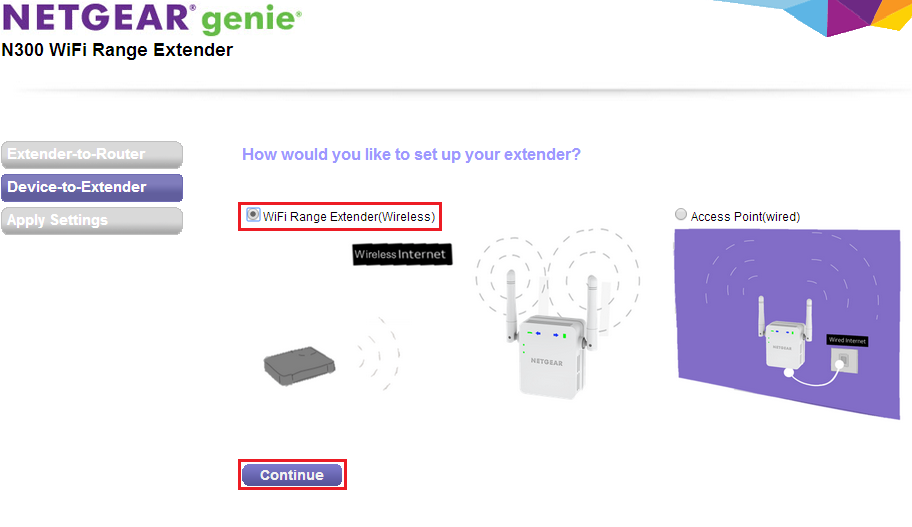
Just bought a brand new Netgear N300 Extender? Firstly, we want to congratulate you. Well, you might be now excited to know how to set it up and running. Kudos! We have a helpful post for you. This all-inclusive guide will take you on the journey of Netgear N300 WiFi range extender setup. Looking forward to taking a ride around our tutorial? Why waiting then, let's go. Get Familiar with Netgear N300 ExtenderPrior to getting started with the setup process, you should get to know your extender inside out so that you can make the most out of it. The range extender provides high speed of the internet to access in every corner of your house or workplace without any interference or buffering. It gives new birth to dead zones. N300 extender includes three main panels: Front, Side, and Bottom. 1. Front PanelAll LED lights are present on the front panel namely Router Arrow LED, Client Arrow LED, Router Link, LED, Client Link LED, WPS LED and Power LED. 2. Side and Bottom PanelThe side and bottom panels of N300 are filled will different ports and buttons. Power On/Off Button, WPS Button, Factory Reset Button and Ethernet Port can be found on these panels. Steps for Netgear N300 WiFi Range Extender SetupNow, let's come to the main question i.e. how do I suppose to perform Netgear N300 extender setup? Let us help you out. Just follow the below given steps.
Though the Netgear N300 setup process is quite simple, most of the users come across an issue i.e. mywifiext login page doesn't open. Due to some technical issues, it might happen that you failed to login. In order to fix this issue, go with the following workarounds:
Now, your N300 extender has been set up properly. Enjoy the extending range and coverage of WiFi signals all over the house or workplace. In the event that you fail to complete the Netgear N300 extender setup, do not waste your time more. Just get in touch with our experts and resolve all your issues in a matter of minutes.
Like it? Share it! |