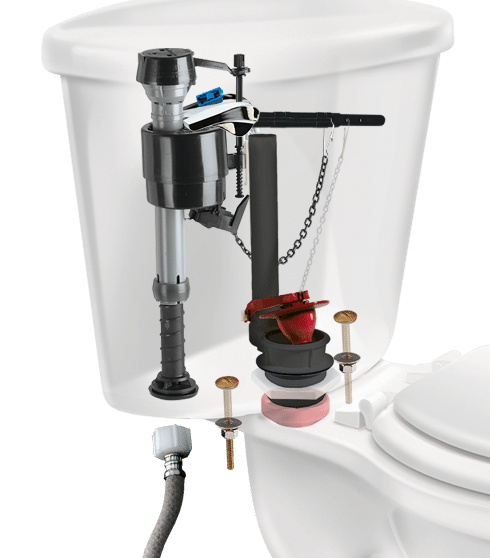
Repairing Tips on a Toilet Flush Valve SeatPosted by williamrudd on March 24th, 2020 The flush valve on most toilets is a two-section undertaking that incorporates the flapper and the valve seat whereupon it rests when it's down. When either the flapper or the valve seat wears out, water leaks from the tank to the bowl and then fill the valve either cycle on and off or runs consistently. That is irritating, however, it squanders water. The valve seat isn't answerable for spills as frequently as the flapper, and when it is, it could be a direct result of the development of silt or mineral stores or in light of the fact that it isn't sealed appropriately.
1. Turn off the water and flush the toilet flapper. Hold the handle down until no more water leaves the tank, at that point wipe what's left into the bowl to totally discharge the tank. 2. Disconnect the flapper chain and unfasten the flapper from the flood tube. It might have elastic ears that you can pull off the flood tube. A few flappers are associated with the cylinder by a ring, and to remove one, you need to slide the ring to the highest point of the cylinder and lift it off. 3. Wipe the valve opening down with a spotless cloth and assess its condition. If it's plastic, and it feels unpleasant, get it dry and sand the unpleasantness out with 150-coarseness wet/dry sandpaper. If it's metal and feels harsh, rub it with medium -00-steel fleece. 4. Assess the sealant ring around the outside of the valve seat. If it feels or looks free or harmed, replaces it with another one. You can purchase replacement rings at hardware stores. The easiest ones to utilize are self-glue and won't stick except if the tank is totally dry. 5. Remove the old seal by getting a handle on and pulling it. It's made of stretchable elastic that will discharge its hold as it extends. 6. Wipe and remaining water from the base of the tank with a cloth, at that point dry the base of the tank with a hairdryer. Set the dryer to medium-hot and keep it moving so you don't overheat any piece of the tank. 7. Remove the paper from the base of the sealant ring and fit the ring around the valve seat opening. Press down to hold fast to the ring to the base of the tank. 8. Replace the flapper and attach the chain that interfaces it to the flush handle. Attempt the handle to ensure it lifts the flapper as far as possible, and guarantee that there is no strain in the chain when the flapper is down. Change the chain as fundamental. 9. Turn on the water and let the tank fill, at that point test the flush. Things You Will Need • Wipe • 150-coarseness wet/dry sandpaper • 00 steel fleece • Sealant ring Tips You can fix a minor break by discharging the tank, drying the valve and spreading silicone oil on the valve seat and flapper to make a superior seal. If you aren't sure if the flush valve is spilling, put nourishment shading in the tank. The valve is spilling if the bowl water turns that shading. Like it? Share it! More by this author |